NetBlade for Windows is installed on a single PC and looks at the networks that PC is connected to: it finds the devices, reads them in depth with the credentials you give it, checks their programs against known vulnerabilities and tells you what to fix first. There is no server, no cloud and nothing to install on the machines it looks at. This guide follows the app's menu page by page, and for each feature says what it needs and where it stops.
NetBlade for Windows will be installed from the Microsoft Store, once published. Updates, the subscription and uninstalling all go through the Store, as for any other app.
How to use it
Open the Microsoft Store and search for NetBlade, once published.
Press Install and open the app from the Start menu.
You need
Windows 10 version 2004 or later, or Windows 11, on a desktop or laptop PC.
The PC must be connected to the network you want to look at: NetBlade sees the networks it can reach from there.
Limits
The app is in the same twelve languages as this site.
NetBlade starts by itself when you sign in to Windows and stays in the notification area even with its window closed: the agent is what runs monitoring, scheduled scans and deep reads, checks against the vulnerability feed, alerts and scheduled report emails. The promise, stated the same way in the app, is this: it runs while you are signed in to Windows, not before sign-in and not on a locked machine nobody has signed in to.
How to use it
In Settings, under «The close button», choose «Hides the window» to keep the agent working when you close the window, or «Quits the app» to stop it until the next sign-in.
Still in Settings, in «The agent», read its state («Running. Last check at …») and use «Start at sign-in» or «Do not start at sign-in».
To bring the window back, click the NetBlade icon in the notification area.
You need
A user signed in to Windows on the PC running NetBlade.
An active subscription or the trial (see Licence).
Limits
The Microsoft Store does not allow Windows services inside an app, so the agent does not run before sign-in.
If automatic start is turned off in Task Manager, under Startup apps, only you can turn it back on there.
Everything the app shows starts from a scan: until you run one, NetBlade touches nothing. The scanned network becomes a site, recognised by its gateway, and the devices found go into the catalog.
How to use it
In the menu open Network and discovery, then «Scan».
In «Where to scan» keep «This network (…)» or choose «A range I type».
Press «Scan» and wait; «Cancel» stops it.
Open Inventory, then «Devices», to see what was found.
In «Credentials» add a Windows, SSH or SNMP account, then press «Deep inventory» to read the machines in depth.
You need
No credential for the scan; credentials are only needed for the deep read.
Many features work without any password; others need a credential and an open port on the machine being read. NetBlade picks the protocol from what the machine has already shown and tries credentials in the order you set, stopping at the first one that gets in: it does not try every credential on every device.
You need
Scan, Port scanner, Tools and Info: nothing.
Reading a Windows PC: a Windows administrator credential and, on that PC, Windows management (WMI over port 135 and RPC) open towards the PC running NetBlade; the enable script does this for you, and also opens file sharing (SMB, port 445), which PsExec uses.
Reading a Linux server or appliance: an SSH credential (port 22).
Reading switches, NAS units, printers and UPSs, and drawing the Map: an SNMP credential (v1, v2c or v3).
Remote actions and uninstalling programs: a Windows administrator credential plus WinRM (port 5985) or PsExec, downloaded by you, with port 445 and the ADMIN$ share.
Active Directory users and computers: a PC that can reach the domain and an account the domain accepts.
Monitoring, scheduled scans and reads, alerts and report emails: a subscription or the trial, a user signed in to Windows and, for sites, the PC connected to that network.
Vulnerabilities: the downloaded feed and a program the dictionary can name.
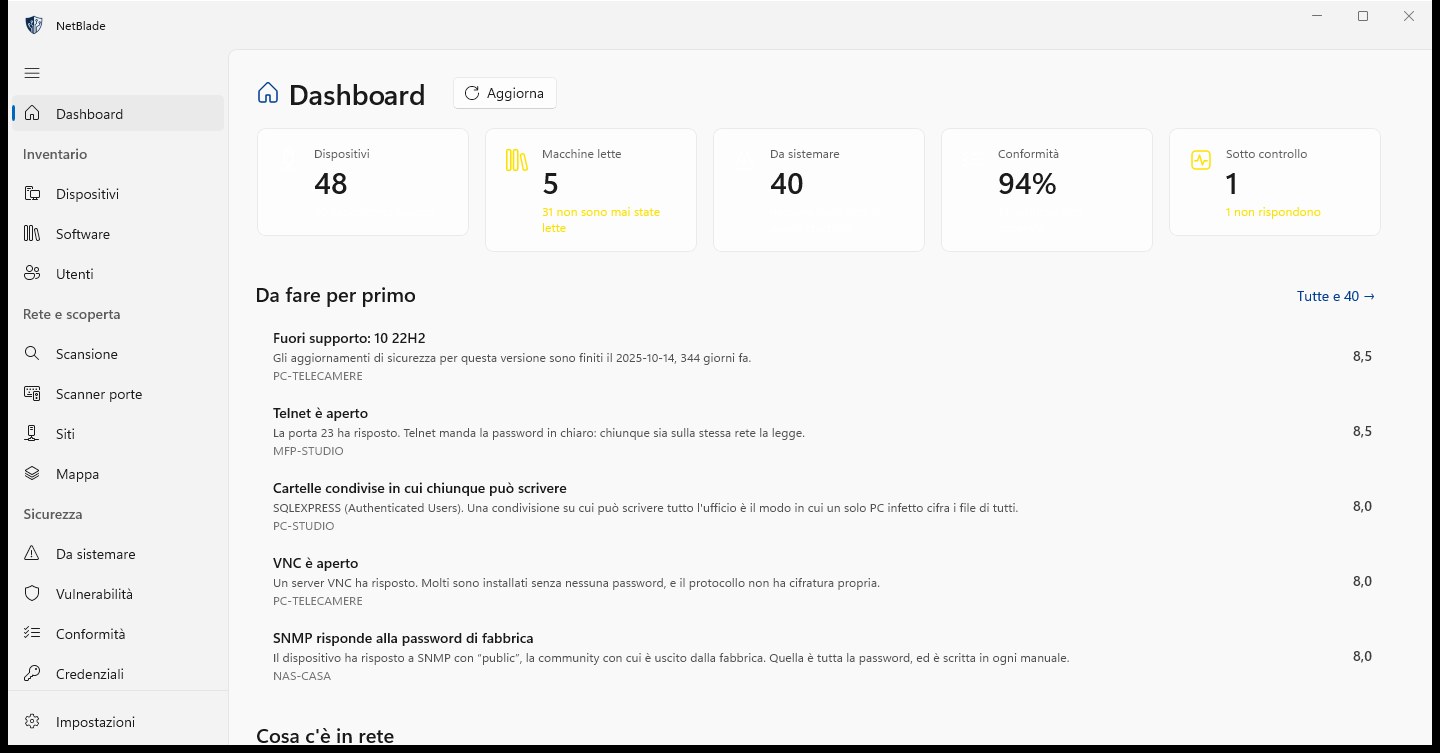
Sums up your networks on one page: how many devices are answering now, «Machines read», how many things are «To fix» and how many are being exploited right now, «Watched» targets and compliance. Below are «Worth doing first», «The last seven days» (new devices, devices that stopped answering, ports newly open, programs installed, updated or removed, defences switched off, new findings, machines that became unreadable), the «Sites» table, «What is out there» and «The app itself», with the agent's state, the last scheduled scan and the vulnerability feed.
How to use it
Open NetBlade: the Dashboard is already selected.
Press «Refresh» to recalculate.
Click an entry to open its detail page; for example «All N →» leads to To fix.
You need
At least one scan; for security data, machines read with credentials.
Limits
A coverage line says how many machines have been read in depth: everything else is only as good as those reads, because a device nobody got into cannot report a problem.
A quiet week and a week nobody looked read the same: that is why the page shows the agent's last run.
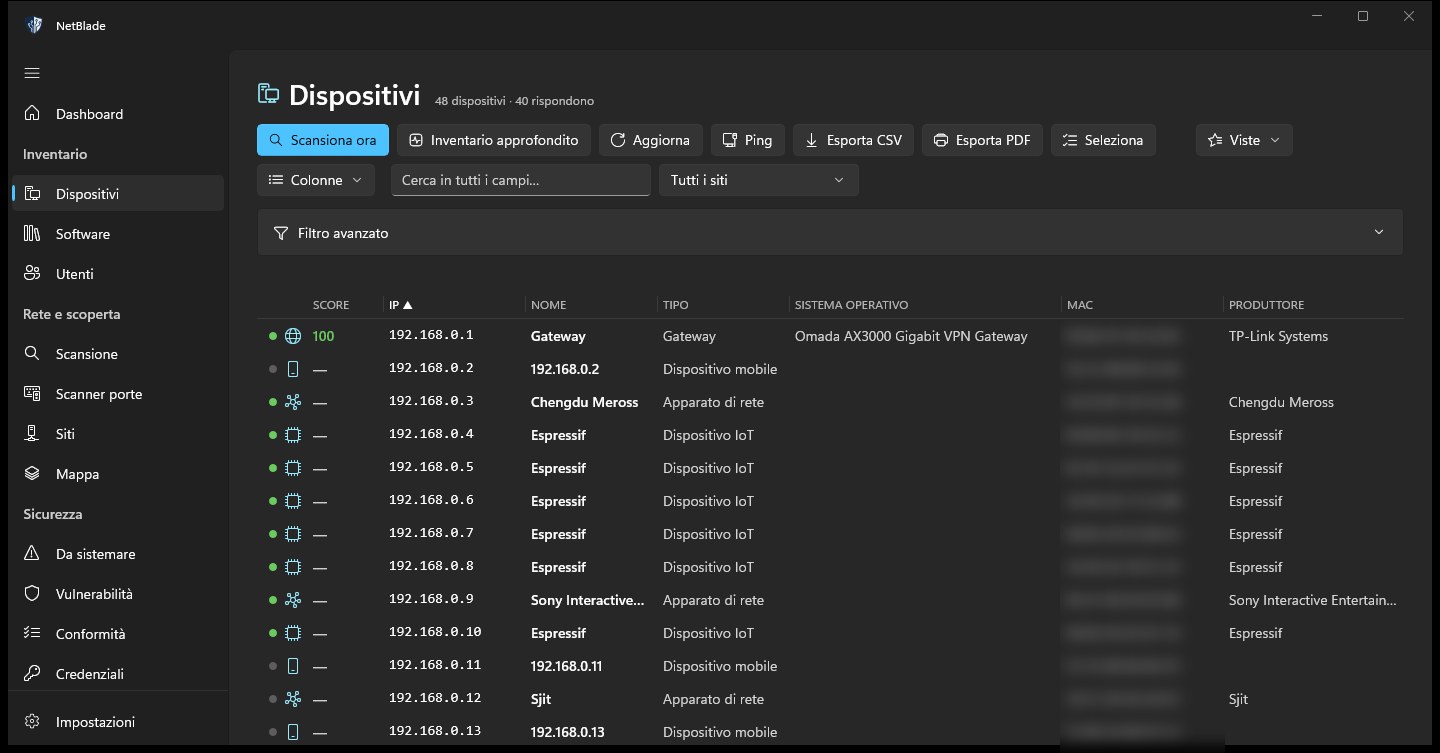
The catalog of every device seen, each with a stable identity, first and last sighting, security score and state. The table sorts by clicking its headers and shows the columns you choose (name, IP, MAC, manufacturer, type, operating system, site, ports, domain, user, model, serial, last read, labels and more); duplicates with the same MAC merge by themselves after every scan.
How to use it
In the menu open Inventory, then «Devices».
Use the toolbar: «Scan now», «Deep inventory», «Refresh», «Ping» (who answers now), «Export CSV», «Export PDF», «Columns».
Search with «Search every field…» and filter by «Score», «Type» or «Only what is answering».
With «Advanced filter» combine several conditions (contains, equals, starts with, greater than, is empty and more) and keep them with «Save as view…»; saved views are in the «Views» menu.
Press «Select» to work on several rows: «Mass edit» (type, notes, a tag, muted alerts, a custom field), «Read selected», «Delete».
Click a row to open the device card.
You need
Nothing for the list; a credential for «Deep inventory».
Limits
A deleted device that is still on the network comes back at the next scan, as new.
Everything about one machine, in tabs: «Summary» (with what the device says about itself and where each clue comes from: DNS, NetBIOS, UPnP/mDNS, web page, certificate, SNMP, Active Directory), «Hardware», «Software», «System», «Security», «Ports», «Interfaces», «Credentials», «Published», «Events» and «History». The header has «Edit…», «Deep scan», «Identify», «Ping», «RDP», «Shadow», «Web interface», «Remote actions» and the «Remote» and «Manage» menus.
How to use it
From «Devices», open the device's row.
«Identify» asks the device what it is without a password (name, DNS, NetBIOS, web page, public SNMP) and checks the main ports.
«Deep scan» (or «Read again now») reads the machine with the credential that applies to it.
«Edit…» changes name, type, tags, notes, «Silent» and «Your own fields» (asset number, floor, contract…). A name and type you set stay locked and no scan overwrites them; «Unlock» gives them back to the scans.
The «Credentials» tab shows which credentials will be tried and in what order; you can save an «Override for this device» with «Save and read this machine», or use «Test» and «Remove».
In the «Published» tab, for SNMP devices, «Ask for everything» walks the whole SNMP tree, standard and vendor parts, with a filter by name, OID or value.
In the «Events» tab, for Windows PCs, «Load Windows events» shows the errors and warnings of the last 7 days.
The «History» tab lists every change: first seen, back online, stopped answering, port opened, program installed, removed or updated, defence switched off or back on, read failed.
You need
For a Windows PC: a Windows credential (WMI on port 135 and RPC). The PC running NetBlade is read without credentials.
For Linux and appliances: an SSH credential (port 22).
For switches, NAS units, printers, UPSs: an SNMP credential (port 161).
Limits
What the «Published» tab shows is not stored: it is asked for each time.
BitLocker and TPM can only be read with an administrator account; otherwise the card says an administrator is needed.
If the PC's firewall blocks the read, the card says so and offers the enable script.
With a Windows credential, NetBlade reads the PC without installing anything on it: name, domain, operating system and build, manufacturer, model and serial number, processor, memory, signed-in user, drives and physical disks, network adapters, monitors, printers, battery, faulty devices and USB. It also reads installed updates, services started automatically, programs that start with Windows, optional features, profiles, local administrators and accounts, open sessions, shared folders and who can write to them, installed programs; and the defences: antivirus, firewall per profile, BitLocker, TPM, Secure Boot, UAC, Remote Desktop, SMBv1 and pending restart.
You need
A Windows administrator credential for that PC.
Windows management (WMI, port 135 and RPC) open towards the PC running NetBlade.
Over SSH, from a Linux server or an appliance, NetBlade reads name, system, kernel, processor and cores, memory and installed packages (dpkg or rpm), and remembers the server's key: if it changes, the read stops. Over SNMP, from switches, NAS units, printers and UPSs, it reads model, serial, firmware, interfaces, ports with VLANs and PoE, MAC addresses learned on each port, supplies and pages printed, contact and location.
You need
An SSH or SNMP credential in «Credentials».
Limits
Over SSH nothing comes back about disks, users or defences: that is the protocol's limit, not the device's.
Over SNMP a device answers with what its agent publishes, and there is nothing more to ask.
When a PC cannot be read because its firewall blocks Windows management, NetBlade prepares a script to run on that PC. The script asks for administrator rights by itself and opens only what is needed, only towards the PC running NetBlade: Windows management (WMI) and service management (port 135 and their RPC ports), file sharing (SMB, port 445) and WinRM remote management (port 5985, for remote actions). Because it also opens service management, PsExec starts at once instead of waiting. On a PC outside a domain it allows remote administrative access with a local account.
How to use it
On the card of the PC that cannot be read, press «Download the enable script».
Copy the script to that PC and double-click it.
Go back to NetBlade and press «Read again now».
To go back to how things were, use «Script to undo the changes» from the same card: it removes NetBlade's firewall rules and administrative access with local accounts.
You need
Administrator rights on the PC to be read.
Limits
Administrative access with a local account lowers that PC's protection a little: use it only where it is needed.
The undo script leaves WinRM on; if it is not needed, turn it off with Disable-PSRemoting.
A catalog of about 150 PowerShell actions that NetBlade runs on the remote PC as administrator, in categories: Diagnostics, Network, Remote management, Firewall, Services, Windows features, Software (including search, install, update and uninstall of a winget package), Local accounts, Security (Defender, BitLocker, TPM, UAC, SMBv1), System (group policy, system file repair, restart, shutdown…), Printers and Custom command. Next to the name, ● marks an action that changes a setting and ▲ a critical one; no mark means it only reads. Before running, the window shows the exact script under «Command that will run on the host».
How to use it
On the device card press «Remote actions».
Pick the «Category», search, and pick the «Action».
Fill in the parameter if there is one (a port, a service name, a winget package ID…).
Read the command preview; for critical actions, marked ▲, tick «I confirm this change on the host».
Run it: the output appears in the window.
You need
A Windows administrator credential for that machine, saved in «Credentials».
A way in: WinRM (port 5985) or PsExec (port 445 and the ADMIN$ share). The top of the window shows the state of each way in, and the «What the remote machine needs» guide explains step by step how to prepare the machine.
PsExec is a free Microsoft tool whose licence does not allow it to be bundled with the app: the «Download PsExec from Microsoft» button fetches it from Microsoft's site when you ask.
Limits
If the PC running NetBlade is not in a domain and the target is not among its trusted hosts, Windows refuses WinRM: in that case NetBlade goes straight to PsExec without trying WinRM first. When WinRM does not answer, it also falls back to PsExec, if present.
Actions run on real machines, often in production: always read the preview.
PsExec does not accept usernames or passwords that contain double quotes.
From the device card NetBlade opens Windows tools already pointed at that machine, according to what it exposes. The «Remote» menu has «PsExec (cmd)», «PsExec (PowerShell)», «Remote PowerShell (WinRM)», «SSH», «WinBox (MikroTik)», «VNC», «Telnet» and «FTP»; the «Manage» menu has «Computer Management», «Event Viewer», «Open C$», «Open ADMIN$», «HTTP», «HTTPS», «Restart…», «Shut down…» and «Wake-on-LAN».
How to use it
On the device card open the «Remote» or «Manage» menu and pick the entry.
«RDP» opens Remote Desktop Connection to the machine.
«Shadow» finds the signed-in user's session and opens it with remote control, always asking the user at the other end for consent.
«Restart…» and «Shut down…» ask for confirmation before sending the command.
You need
External tools must be installed on the PC running NetBlade (WinBox, VNC Viewer, PsExec); if one is missing, the app says so.
For Shadow: a Windows PC with a signed-in user and Remote Desktop permissions.
Limits
«SSH» opens the Windows SSH client in a command window: NetBlade has no built-in SSH session.
A remote restart or shutdown makes signed-in users lose unsaved work.
In the device's «Software» tab, «Uninstall» removes a program without opening any window on the PC, then reads the machine again to check it is really gone, instead of trusting the exit code. Programs installed with their own .exe that offers no silent uninstall are marked «Manual removal only», with the explanation and the shortcuts «Open Remote Desktop» and «Shadow the user's session».
How to use it
Open the device card, then the «Software» tab.
Next to the program press «Uninstall» and confirm.
Wait for the check: the app says whether the program was removed, whether a restart is needed, or whether it is still installed.
You need
A Windows administrator credential and WinRM or PsExec, as for remote actions.
A PC read on or after 23/09/2026: if it was read earlier, read it again with «Deep scan».
Limits
Whoever uses that PC may lose work done in the program being removed.
Every program found on every machine read, with publisher, newest and oldest version, how many machines have it and whether the vulnerability dictionary can name it. It is the page for questions like "who still has the old version?".
How to use it
In the menu open Inventory, then «Software».
Filter by program, publisher or version, by site, or with «Only what the dictionary can name».
Click a row to see versions and machines.
Export with «Export CSV» or «Export PDF».
You need
Devices read in depth.
Limits
A program the dictionary cannot name gets no vulnerability verdict anywhere in the app: silence is not safety.
Finds who answers on the network, with parallel ping and the ARP table, and for each host reports IP, name, MAC, manufacturer, type and response time. The manufacturer comes from the IEEE registries bundled with the app; random MAC addresses and those of virtual machines are recognised as such. A scanned network becomes a site, recognised by its gateway's MAC.
How to use it
In the menu open Network and discovery, then «Scan».
In «Where to scan» choose «This network (…)», «A range I type» («From» and «To» fields), «Active Directory computers…» or «Active Directory users…».
For a range you will use again, press «Keep this scope» and give it a name, for example "Milan office, printer VLAN".
Press «Scan»; «Cancel» stops it.
For Active Directory computers, give the directory path: the computers found go into «Devices».
You need
No credential, except for Active Directory.
Limits
A range outside the network the PC is connected to is scanned but not stored: a site is recognised by the gateway in front of it, and there is no way to tell it apart from another network using the same addresses.
A MAC address beyond a router can only be seen over SNMP.
Tries TCP ports, the 118 most common or all 65,535, and the six UDP services that answer a request (DNS, NTP, NetBIOS, SNMP, SSDP, mDNS). It reads the banner where the service sends one, classes each port as sensitive, notable or info, and works out a «Security score» with the «Security findings» in order of severity (Telnet, Android debugging, Redis, Docker, RDP, SMB, VNC, databases, FTP, HTTP without HTTPS, SNMP, SSH, a wide surface…). Web ports get a «Web» link.
How to use it
In the menu open «Port scanner».
Type the «Host», IP address or name.
In «Ports» choose «Most common (118)» or «All (1–65535)», and tick TCP, UDP or both.
In «Speed» choose «Fast» or «Slow, more accurate», useful with firewalls that drop packets instead of refusing them.
Press «Scan»; «Stop» interrupts it.
You need
Nothing.
Limits
A silent UDP port cannot be told apart from a closed one, which is why there is no honest "all" for UDP.
No SYN scan and no OS fingerprinting from packets: they would need a capture driver whose licence cannot be redistributed.
The recognised networks, one per customer or office, with name, network, gateway, number of devices, last scan, automatic scan and scheduled deep read. The page also says whether the PC is connected to that network right now.
How to use it
In the menu open «Sites».
«Scan now» finds who answers right now, without a password.
«Identify every device» asks each one what it is, without a password, and checks the main ports.
«Read every device» signs in with the site's credentials and reads programs, updates, antivirus and disks, then checks them against known vulnerabilities and the compliance rules.
«Credentials» shows the credentials that apply only to that site.
«Rename» gives the site a name, for example the customer's; «Forget» removes the site, its devices and its history after a confirmation, leaving the credentials.
In the «AUTO» column turn on the automatic scan and in «HOW OFTEN» choose «Every 15 minutes», «Every hour», «Every 4 hours» or «Once a day».
In the «IN DEPTH» column choose «No, only who is there», «Every 4 hours», «Once a day» or «Every week».
You need
For automatic scans and scheduled reads: the agent running (subscription or trial) and a user signed in to Windows.
Limits
The agent only rescans the site the PC is connected to at that moment.
The scheduled deep read reads one device at a time.
A new site is only created by a scan you run yourself.
Rebuilds how the network is wired by asking switches, routers and access points, over SNMP, what is connected to which port: LLDP and CDP for links between network devices, MAC tables for every other device. The legend tells a link stated by the devices apart from one worked out from the MAC table; below the map are the devices named by the network gear but not in the catalog, and those not placed on any port.
How to use it
In the menu open «Map».
Press «Read the network».
Zoom in, zoom out or use «Fit to window»; click a node to open its card.
You need
An SNMP credential valid for the switches and router, in «Credentials», and those devices already read over SNMP with «Deep inventory»: the map only asks devices that have answered before.
LLDP turned on on the network devices (on Omada, UniFi, HP and Aruba it is on out of the box).
The PC connected to that network.
Limits
A network can only be read from a PC connected to it.
Network devices that do not answer SNMP do not appear as network nodes.
05
Security
What is wrong, in what order to fix it, and which credentials to look with.
A single list of everything that is open: program vulnerabilities, operating systems out of support and configuration checks. It is sorted by what matters: first what is on CISA's list of vulnerabilities being exploited right now, then the likelihood of exploitation (EPSS), then severity (CVSS). Each entry has a badge (exploited, critical, high, medium, low, unscored), the reason, how many days it has been open and what to do.
How to use it
In the menu open Security, then «To fix».
Press «Check now» to compare again.
To accept a risk, select the entry and press «Accept / reopen»: it becomes an exception, which also counts in Compliance.
«Show accepted» brings the exceptions back into view.
You need
Devices read in depth for programs and defences, or identified or port-scanned for the network checks.
The vulnerability feed downloaded.
Limits
A check only fires on what the machine has shown, never on what it did not say: an empty list may mean no machine has been read yet.
If the feed is more than a week old, the page says so.
Besides vulnerabilities, «To fix» checks each device's configuration: Telnet, FTP, reachable Remote Desktop, VNC, Android debugging, IPMI, industrial PLCs (S7, Modbus), listening databases, UPnP, raw printing on port 9100, SNMP with a factory community, firewall off, no antivirus, shares writable by everyone, no updates for too many days, SMBv1, UAC off, Secure Boot off, pending restart, Guest account enabled, too many local administrators, PowerShell 2.0, full disk. It also flags systems out of support and those whose support ends within 180 days.
You need
A read of the PC for the Windows checks; a port scan or identification for the network ones.
Limits
An operating system the feed does not know gets no support verdict.
The known vulnerabilities (CVEs) of installed programs, in two views: «By update» (program, installed version, «UPDATE TO», how many CVEs, how many exploited, the worst, the devices) and «By CVE» (severity, likelihood, date found). The tiles sum up «Exploited now», «Critical», «High» and «Devices affected»; the advice says which version to update to in order to close every CVE of that program.
How to use it
In the menu open «Vulnerabilities».
Press «Check again»: it downloads the feed if needed and compares again.
Switch between «By update» and «By CVE», tick «Exploited only», search by program, CVE or device.
Click a row for the list of CVEs and affected devices.
You need
Devices read in depth.
The vulnerability feed, which NetBlade downloads by itself.
Limits
Only programs NetBlade's dictionary can name are checked; the others get no verdict.
A version that cannot be compared reliably gets no verdict.
Vulnerabilities only show on devices read in depth, and the page says how many those are.
This product uses the NVD API but is not endorsed or certified by the NVD.
Checks 17 baseline rules on every device they apply to, in four areas (Defences, Updates, Access, Network), with a reference to CIS Controls v8 IG1 as guidance. The rules: antivirus on; Windows firewall on; system drive encrypted; UAC on; Secure Boot on; operating system still supported; updates installed in the last 60 days; SMBv1 off; Guest account disabled; at most three local administrators; no shared folder writable by everyone; PowerShell 2.0 removed; no service with a clear-text password; remote access not exposed; SNMP without a factory community; databases not reachable from the network; no management interface exposed.
How to use it
In the menu open «Compliance».
Press «Check again».
Read the tiles «Compliance with the baseline», «Average posture» and «Rules broken», and the «Devices in the worst shape» list.
Click a rule to see non-compliant devices, accepted exceptions and devices that cannot be checked; click a device to open its card.
You need
Windows reads for the PC rules; a port scan or identification for the network rules.
Limits
For each device a rule is kept, broken, an accepted exception or not checkable; devices that cannot be checked count neither for nor against.
It is a reference, not a certification. CIS Controls is a trademark of the Center for Internet Security.
Every device gets a score from 0 to 100, in four bands: «In good shape», «Worth watching», «Needs work», «At risk». The «Why» lists what weighs: vulnerabilities being exploited now, out of support, likely to be exploited, critical, high severity, configuration problems and other findings; one exploited flaw weighs more than many theoretical ones.
Limits
A device that was never read and has nothing known against it is «Not scored»: there is nothing to base a number on, and a hundred would be a lie.
The store of Windows, Linux/SSH and SNMP credentials (v1 and v2c with a community, v3 with user, MD5 or SHA authentication and DES or AES encryption). Each credential applies «Anywhere», to «One site», to «One device» or to «These scan scopes»; the narrowest always wins, and where a credential does not apply it is not even tried.
How to use it
In the menu open «Credentials».
Press «Add…» and fill in protocol, username (for example .\Administrator or DOMAIN\user), password or community, «Where it applies» and label; then save it.
Type a «Machine to try» and press «Test»: the «LAST TEST» column says «Works» or «Failed».
Change the order with «Try earlier» and «Try later», the scope with «Where it applies…», or delete it.
You need
Nothing.
Limits
Passwords are encrypted for your Windows account on that PC and, once saved, are never shown again.
SNMP v1 and v2c send the community in the clear over the network.
With SNMP v3 you must pick the algorithms the device is really set to: a wrong choice looks just like a device that is switched off.
Rules that decide what is sent to you, about which devices, to whom and when. The topics are «New devices», «Devices that stopped answering», «Ports newly open», «Watched targets going down», «Defences switched off», «Software changes» and «New things to fix», the only one with a threshold: «Only what is being exploited», «That, and the likely ones» or «Everything found». Alerts go out by email or to a webhook, which receives JSON that Slack, Discord and automation platforms can read.
How to use it
In Settings, in «Mail servers and webhooks», press «Add a server»: an SMTP mail server (automatic encryption, STARTTLS, TLS from the start or none) or a webhook address; then test it.
In the menu open «Alerts» and press «New alert».
Choose the topic, the device types (no tick means all), the site and the recipients.
Choose «Tell me at once» or «In the daily summary», at the hour you prefer; then «Save».
«What was sent» shows the history; «Send what is owed» forces the send.
You need
A mail server or webhook set up.
The agent running (subscription or trial) and a user signed in to Windows.
Limits
If the PC is off, alerts go out when it comes back on.
A new alert starts from now: what happened before is not sent.
«Defences switched off» fires only when a read actually sees antivirus, firewall or BitLocker go from on to off, never for "we could not tell".
Besides alerts, the agent shows Windows notifications (new device, target down or back, new findings) when «Notifications» is set to «On» in Settings.
Eight ready-made reports, each in PDF and CSV, with your header (logo, name, contact details). For the owner: «Summary for the owner», with score, compliance, the five things to do first, the updates that close the most vulnerabilities, changes and «What this report cannot say». For the technician: «Technical annex», device by device, and «Vulnerabilities». For review: «Compliance», with the exceptions register, and «Changes in the period». For inventory: «Device inventory», «Software inventory» and «Hardware inventory».
How to use it
In the menu open System, then «Reports».
Choose the «Scope» (one site or all) and the «Period» (7, 30 or 90 days).
Under «Header» press «Change» for the logo, «Who signs the reports» and «Contact» (also in Settings, «Report header»).
Press «PDF» or «CSV» on the report you need; «Open» then opens the finished file.
With «New custom report» build a table of devices with the columns, conditions and order you choose, for example "PCs on Windows 10".
With «Schedule a send» choose report, format, «Every week» or «Every month», day, hour, mail server and recipients; «Send now» sends it at once.
You need
For scheduled sends: a mail server set up, the agent running (subscription or trial) and a user signed in to Windows.
Limits
Each report is a scan of what answered, not an audit: it is neither a certification nor a penetration test.
If the PC was off at send time, the report goes out when it comes back on.
Targets the agent keeps checking even with the window closed: a «Ping», a «TCP port» or an «HTTP» page, which counts as up when the response is below code 500. Each row shows the state («Up», «Down» or «Not checked yet»), since when, and the time of the last check; a change of state becomes a notification.
How to use it
In the menu open «Monitor».
Type the «Address or name», choose «How» and, if needed, the «Port».
Press «Watch it».
«On/off» pauses a target, «Remove» deletes it.
You need
A subscription or the trial.
A user signed in to Windows.
Limits
Targets are checked while you are signed in to Windows, about once a minute.
Twelve things you can ask a network without a password, even about a device that is not in the catalog. «Can I reach it»: Ping, Traceroute, Port check. «What is it»: DNS lookup forward and reverse, HTTP headers (without following redirects), TLS certificate (expiry, issuer, fingerprint), SNMP and MAC lookup, which works offline. «This PC»: Network adapters, ARP table, Subnet calculator and Wake-on-LAN.
How to use it
In the menu open «Tools».
Pick the tool and type the address, MAC, ports, prefix or community.
Press «Ask».
If the device is in the catalog, «Open the result ›» leads to its card; the result can be copied into a ticket.
You need
Nothing.
Limits
Wake-on-LAN only works on the same network segment, and there is no confirmation that the machine woke up.
A traceroute hop that does not answer does not mean the path is broken.
Where the PC is attached, from the desk to the way out: «This PC» (IPv4 and IPv6 addresses, DNS, MAC), the gateway (MAC, manufacturer, latency), «Who gives you internet» (operator, ASN, country, region and city), «Who resolves your names» (the configured DNS compared with who actually answers) and «How fast it goes», with download, upload and latency.
How to use it
In the menu open «Info».
Press «Refresh».
Press «Measure» for the speed test.
You need
An internet connection for the way out and the speed test.
Limits
The location is the one a registry assigns to the public address, not the PC's: it is often the operator's office.
The way-out details come from ipinfo.io; the speed test uses speed.cloudflare.com, which sees your address, runs only when you press it and discards the first seconds.
07
Settings
How the app behaves, where alerts go out from, and the details for support.
In «Appearance» you choose the theme: «As Windows», «Light», «Dark» or «Day and night», which switches between the two at the hours you pick. In «Behaviour» you turn Windows «Notifications» on or off and decide what «The close button» does: «Hides the window» keeps the agent working, «Quits the app» stops it until the next sign-in.
Where alerts and scheduled reports go out from. The server is set up once here; what to send, about which devices and when is decided on the Alerts page and in the Reports scheduled sends.
How to use it
Press «Add a server».
Choose email or webhook and fill in server, port, encryption, user, password and recipients, or the webhook address.
Shows the date and age of the feed programs are checked against; «Check now» looks for a newer one straight away. It carries the notice: This product uses the NVD API but is not endorsed or certified by the NVD.
Limits
With a feed older than a week the checks still run, but a vulnerability published since then is not in it.
«What's new, details and licences» opens the page with version, source, system, database, feed, licence, agent and data folder, plus what's new in this version and the third-party components with their licences. From there you can use «Copy details for support», «Email support» and «Open the log folder».
Limits
What NetBlade does not do is written in Settings rather than found out later: it scans only the networks it can reach; a MAC beyond a router is only seen over SNMP; there is no SYN scan and no OS fingerprinting from packets; a program outside the dictionary is not checked; and it is not a penetration test: no factory passwords tried, no exploits.
NetBlade for Windows starts with a 7-day free trial, first time only, then continues with a Microsoft Store subscription: €6.99 a month or €49.99 a year, or the equivalent in your country's currency. Purchase, renewal, cancellation and receipts are handled by the Store.
How to use it
In Settings, in «NetBlade Pro», press «Subscribe».
Choose the monthly or yearly subscription and complete the purchase in the Store.
You need
A Microsoft account on the PC.
Limits
There is no server of ours: the app asks the Store whether the licence is active, and that is all.
NetBlade for Windows has no free tier: without an active subscription every section shows the «Subscribe to NetBlade» page, with the two plans, the price in your currency and the free trial if your account has not used it yet. Only Settings stays open. The background agent does not run.
Limits
What you collected is not deleted: it stays on the PC and comes back as soon as you subscribe again. Uninstalling the app, on the other hand, makes Windows delete it.
«I already have a subscription» asks the Store again, for someone who subscribed on another PC with the same Microsoft account.
Everything NetBlade scans and reads stays in a SQLite database inside the app, on that PC: nothing reaches us. Credentials and mail server passwords are encrypted with DPAPI for your Windows account, so a copy of the database is of no use to anyone else.
Every day NetBlade downloads the vulnerability feed, a signed file the app verifies before using it; the comparison with installed programs happens locally, and program names and versions never leave the PC. Everything else goes out only when you ask: the tools you run reach the hosts you point them at, the Info page queries ipinfo.io, the speed test uses speed.cloudflare.com, the PsExec button downloads from live.sysinternals.com, and alerts and reports go to the mail servers and webhooks you set up.
Limits
A feed with an invalid signature is discarded, and the last good one stays in use.
This product uses the NVD API but is not endorsed or certified by the NVD.