NetBlade is a network Swiss-army knife for people who look after a small or medium network: it finds devices, checks ports, analyzes Wi‑Fi and puts more than twenty-five sysadmin tools in your pocket. This guide follows the app tab by tab and explains what each feature does, how to use it and where it stops. It is free with ads, needs no account and keeps your data on your phone.
NetBlade is installed from the Google Play Store and runs on Android 8.0 or later. It needs no account and no root: everything it does, it does with ordinary app permissions. On first launch you get a welcome screen; the app is available in 43 languages and you can switch from the settings.
How to use it
Search for "NetBlade" on the Play Store and install it.
Open it and tap "Get started" on the welcome screen.
For another language, open the "Settings" tab → "Language".
You need
Android 8.0 or later.
Limits
Some features depend on what the phone maker lets apps do (the ARP table, the ping command): on some models they return less information, but the app does not crash.
The bottom bar has five tabs: LAN, Ports, WiFi, Tools and Settings. At the top you find the "Favourites" star with the tools you have starred, the "My network" icon with a summary of your connection, and the router icon that opens "Saved networks". Inside each tool the "?" icon opens its help, and tools that produce a result have a "Share" button at the bottom.
How to use it
Tap the star next to a tool in the Tools tab to add it to "Favourites".
Open "Favourites" from the star at the top to reach it in one tap.
To leave the app, press back and confirm: any scan still running will stop.
NetBlade asks for a permission only when the feature you opened uses it, and each permission has a specific reason. You can deny them all and still use most of the tools.
You need
Location (and on Android 13+ "Nearby Wi‑Fi devices"): to see nearby Wi‑Fi networks and the name of the network you are on. This is an Android rule, not the app's choice.
Notifications (Android 13+): for background monitoring alerts and the "Host monitor".
Bluetooth or "Nearby devices" (Android 12+): for "Bluetooth LE" and "Tracker scan".
Location, optional: to record where you ran a Wi‑Fi scan, for the "Network map", and as the starting point of the "Traceroute map".
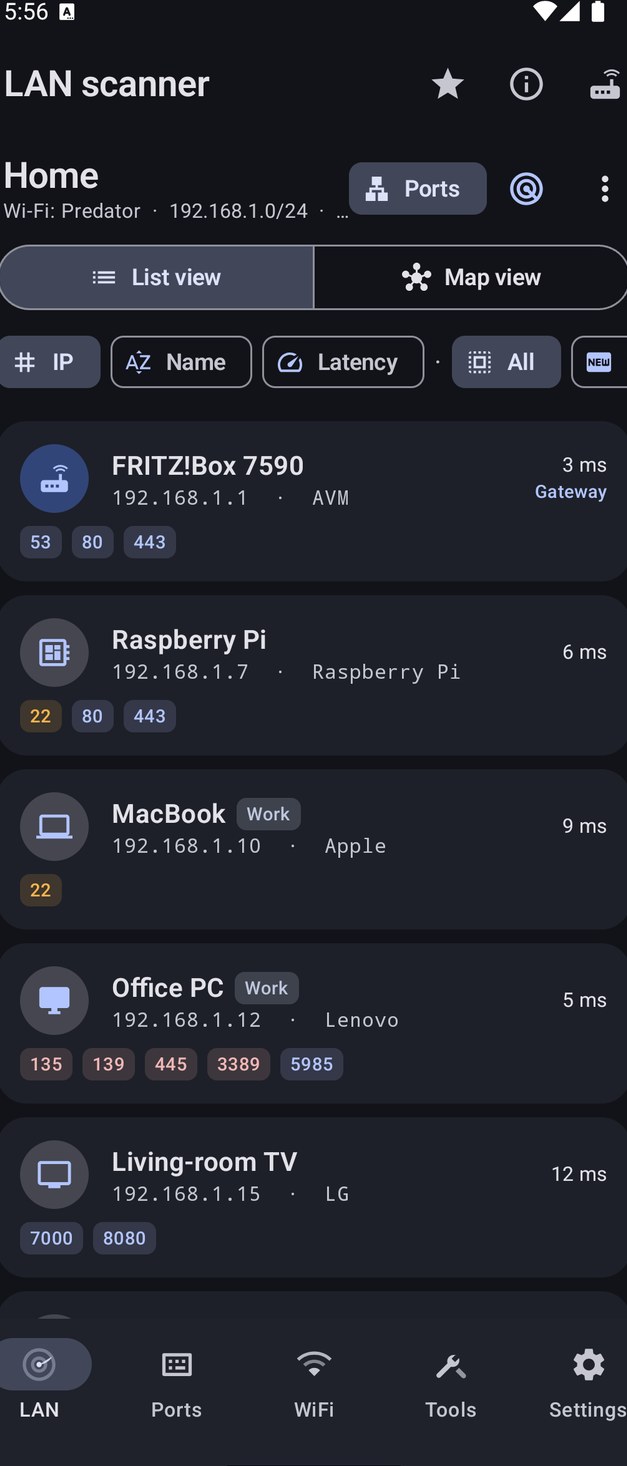
Connect to the network you want to explore, open the LAN tab and tap the radar icon: within seconds you see every device that answers, with IP address, vendor, name and latency. From there, tap a device to open its full details.
How to use it
Connect the phone to the Wi‑Fi of the network you want to explore.
Open the "LAN" tab and tap the radar icon ("Scan network").
Wait for the sweep to finish: the "Scan summary" opens.
Tap a device to see its details.
If it is your network, name it with ⋮ → "Name network": from then on NetBlade remembers it.
02
LAN scanner
Everything that lives on your local network, device by device.
NetBlade probes every address of the subnet you are connected to in parallel, and shows for each device its IP, MAC and vendor (when they can be recovered), hostname, latency and role (Gateway or "You"). Meanwhile it listens to Bonjour (mDNS) and UPnP (SSDP) to collect the names, models and operating systems devices announce, and on every host it finds it automatically checks the common ports, a few UDP services (DNS, NTP, TFTP, mDNS, NetBIOS, SNMP) and the NetBIOS name. The vendor comes from a built-in database of about 40,000 MAC prefixes, without asking the internet.
How to use it
Open the "LAN" tab and tap the radar icon ("Scan network").
Follow the progress; tap "Stop" to interrupt.
When the sweep ends, read the "Scan summary": devices found, new devices, duration, open ports, devices without MAC and the result of "SNMP MAC recovery". It keeps updating as the port checks finish.
Sort by "IP", "Name" or "Latency" and filter with the "All", "New", "Open ports" chips.
From the ⋮ menu you can "Save" the scan, "Share" the result or "Scan another subnet" by typing a CIDR such as 10.0.0.0/24.
You need
The phone connected to a network (usually Wi‑Fi).
Limits
Since Android 10 the system restricts apps' access to the ARP table: some MACs may stay "Not recovered". NetBlade tries several routes, including the router over SNMP if you set it up.
A device that does not answer ping and is not the gateway does not show up.
On another subnet the scan goes through the router: no MACs, no Gateway or "You" role.
Ping timeout, thread count, reverse DNS and vendor lookup are set in "Settings" → "LAN scan".
Once you name the network ("Home", "Work"…) NetBlade remembers its devices: those never seen before get the "NEW" badge, and you can turn on monitoring. In the same dialog you can let NetBlade read the router's ARP table over SNMP (v1, v2c or v3), read-only, to recover the MACs Android hides.
How to use it
"LAN" tab → ⋮ → "Name network".
Type the name.
If you want alerts, turn on "Monitor this network".
If the router supports SNMP, turn on "Devices from router (SNMP)", pick the version and enter the community (often public) or the v3 credentials.
Tap "Save". If recovery comes back empty, retry with ⋮ → "Retry SNMP MAC lookup".
You need
SNMP enabled on the router, only for MAC recovery.
Location permission, optional, to place the network on the "Network map".
Limits
Many ISP-supplied routers do not expose SNMP.
The SNMP community and credentials are stored unencrypted in the app's database, so they also end up in your Google account backup.
Tapping a device opens its details: IP, MAC, vendor, model and operating system (if the device announces them), hostname, latency, role and "First seen" date. Two icons at the top share a text summary or show it as a QR code. At the bottom, in "Personalize", you give it a name, notes, an icon out of more than thirty types, and a tag or group.
How to use it
Tap a device in the list or on the map.
Scroll through the sections: security assessment, ports, sharing and services, identity, SNMP, inventories.
In "Personalize" set the name, "Description / notes", "Icon" and "Tag / group", then "Save"; "Forget" removes it from the remembered devices.
If you do not want join and leave notifications for that device, turn on "Mute this device".
If the MAC is known, "Wake" sends it a Wake-on-LAN packet and "Add to wake list" puts it among the "Devices to wake".
Every device gets a score from 0 to 100 with a level from "Good" to "Critical", based on the ports it has open. Each finding explains the risk and what to do: exposed Telnet, RDP, SMB, VNC, ADB over network, Redis, databases and Docker API, cleartext FTP and HTTP, SNMP, too large an attack surface. When a banner reveals the software version, the "Search CVE" link opens a search on the NVD website in your browser.
How to use it
Open a device's details after a scan.
Read "Security assessment" and the advice under each finding.
Tap "Search CVE" next to a detected version to look for known vulnerabilities.
Limits
The score is based on what answers from the network: a device that drops the probes shows as "Likely behind a firewall" and not much can be said about it.
The device details show the result of the automatic common-port check, which you can redo with "Scan" or "Rescan". Each open port has a "Connect" menu: web pages open in the browser, SSH in NetBlade's built-in terminal, RDP, VNC, Telnet, FTP and SMB in a suitable external app, or you copy the address.
How to use it
In the device details go to "Common ports".
Tap an open port → "Connect".
Choose "Open with…" or "Copy address". If no suitable app is installed, NetBlade offers to search the Play Store.
"Sharing & services" lists what the device announces over Bonjour and UPnP. The "Identify" button asks the device for its NetBIOS name, workgroup, likely operating system and web server, and works it out locally without sending data off the phone. "Shared folders (SMB)" lists the share names of a PC or NAS, as a guest or with "Use credentials".
How to use it
In the device details tap "Identify".
In "Shared folders (SMB)" look at the shares visible to a guest.
If you see none, tap "Use credentials", enter "Username (or DOMAIN\user)" and "Password", and try again.
Limits
NetBlade lists the share names but does not browse their contents.
Credentials used here are kept in memory only and never saved.
For printers, NAS boxes, switches and routers that speak SNMP, "SNMP details" shows name, location, contact, uptime and description, then what is specific to the kind of device: toner, page count and serial number for printers; CPU, RAM, storage, processes and users for NAS boxes and servers; interfaces, switch ports, VLANs, IP addresses and IP forwarding for switches and routers; hardware and firmware. Tap an interface for its live traffic graph, refreshed every 2 seconds.
How to use it
In the device details open "SNMP details".
If the device uses different credentials from the network, tap the ⚙ icon and set "SNMP for this device".
Tap an interface for the traffic graph.
You need
SNMP enabled on the device.
It is an advanced feature (see "Free and advanced features").
Limits
If the device does not answer you see "No SNMP response"; some interfaces do not expose traffic counters.
"Map view" draws the network as a tree: gateway, then switches and access points, then devices. If managed switches answer SNMP the structure is rebuilt from their tables; otherwise the network appears as a single segment and you can draw it yourself.
How to use it
After a scan, in the "LAN" tab switch from "List view" to "Map view".
Tap a node and pick "Open details", "Mark as switch", "Connect to…" or "Detach".
Tap "Rebuild" to redo the graph from scratch.
Limits
A device without a MAC cannot be placed on the map.
Without SNMP on the switches, the topology is only what you build by hand.
With a local administrator's credentials NetBlade reads a Windows PC without installing anything on it. Over file sharing (SMB) it gets the exact Windows version and build, disks and free space, user profiles, shares, local administrators and groups, and installed programs with the version read from inside the executable. If WinRM is enabled on the PC it adds model, processor, memory, BIOS serial, last boot, signed-in user, clock drift, services, recent updates, local accounts, startup programs, network adapters and the state of its defences: antivirus and signatures, firewall per profile, BitLocker encryption, TPM and SMB1. Results are split into "System", "Hardware", "Software", "Security" and "Accounts".
How to use it
Scan the LAN and open the PC's details: the "Windows inventory" section appears when the device looks like a Windows PC.
Tap the key icon and enter "User", "Password" and "Domain (empty for a workgroup)". Alternatively set the credentials once on the saved network, in "Windows PCs on this network".
Tap "Run inventory".
If it fails, "Why, and what to do" explains the reason: port 445 closed, credentials refused, administrative share denied and so on.
"How to get more data" shows the commands for you to run on the PC, in PowerShell as administrator: winrm quickconfig to enable WinRM and, on workgroup PCs only, New-ItemProperty -Path 'HKLM:\SOFTWARE\Microsoft\Windows\CurrentVersion\Policies\System' -Name LocalAccountTokenFilterPolicy -PropertyType DWord -Value 1 -Force. NetBlade does not run them for you.
You need
A local administrator account on the PC.
File and printer sharing enabled, with the network set as Private in Windows Firewall.
WinRM (port 5985) for the extended data.
It is an advanced feature.
Limits
On workgroup PCs Windows strips local accounts of their admin rights when they log on over the network: without the registry key above (or the built-in Administrator) disks and administrators are missing.
An account without a password cannot log on over the network.
Some configurations restrict reading the local groups.
WinRM is used on port 5985 (HTTP with NTLM authentication), not 5986.
Windows credentials are encrypted on the phone and left out of every backup: after a restore you need to enter them again.
After a Windows inventory, NetBlade can ask the National Vulnerability Database (NVD) for the vulnerabilities published for the exact version of the programs it recognises, about seventy widely used products. You see them worst first, with the CVSS score and a link to the NVD entry. The count is honest: how many programs were checked, how many were not recognised and how many could not be checked because the database did not answer, never rounded up to "all clear".
How to use it
In the PC's details, after the inventory, go to "Known vulnerabilities".
Tap "Check online".
The first time, read and accept the consent.
Tap a CVE to open it on nvd.nist.gov.
You need
An internet connection.
Your explicit consent.
It is an advanced feature.
Limits
Only the name and version of the recognised programs leave the phone: never the PC's name, the full program list or the credentials.
A program outside the dictionary gets no verdict.
Answers are cached for a week, so a CVE published today may show up a few days later.
The check covers Windows programs; the Linux inventory does not include it.
NetBlade connects over SSH with any account, no sudo and no writes, and runs a single read-only script that it shows you before starting. It collects distribution, kernel, architecture, virtualization, SELinux or AppArmor, firewall, package manager and installed packages, listening ports, containers and pending updates, with how many are security updates.
How to use it
Open the details of a host that answers on SSH and go to "Linux inventory".
Tap the key icon and enter "Username" and "Password", or paste a "Private key (optional)" with its "Key passphrase".
Read "What NetBlade runs on this machine" and start the read.
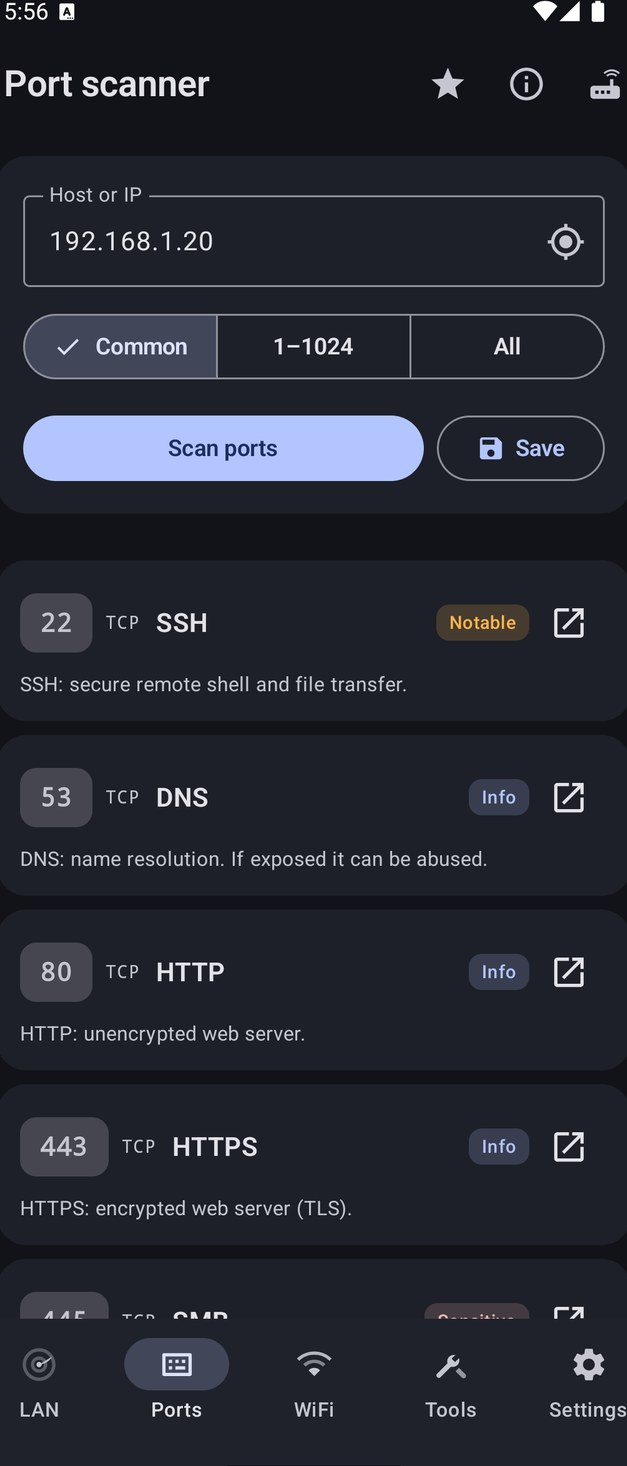
Checks the TCP ports of a host and for each open one shows the service name, a plain-language description and a risk level ("Sensitive", "Notable", "Info"). It also reads the service greeting (web server and page title, SSH, FTP, SMTP banners…) and at the end adds the UDP services confirmed with specific probes: DNS, TFTP, NTP, NetBIOS, SNMP, SSDP and mDNS.
How to use it
Open the "Ports" tab.
Type "Host or IP" (for example 192.168.1.1) or tap "Use gateway".
Pick the range: "Common" (about 120 chosen ports covering cameras, NAS boxes, admin panels, databases, industrial systems), "1–1024" (plus the common ones) or "All" (1–65535, slower).
Tap "Scan ports"; "Stop" to interrupt.
On an open port use "Connect", or tap the banner to "Search CVE".
Tap "Save" to keep the result in "Saved scans".
Limits
It is a TCP "connect" scan: a SYN scan would need root.
For UDP it checks only the seven services listed above; it is not a generic UDP scan.
A firewall that drops packets makes ports look closed.
Timeout and default range are set in "Settings" → "Port scan".
04
WiFi
The networks around you and the channels where they step on each other.
Lists nearby Wi‑Fi networks with SSID (or "Hidden network"), signal in dBm, channel, band (2.4, 5 or 6 GHz), channel width and security (Open, WEP, WPA, WPA2, WPA3, with WPS flagged), highlighting the one you are connected to. For 2.4 and 5 GHz it draws the "Channel usage" and gives a "Channel recommendation": the least busy one, or "already optimal".
How to use it
Open the "WiFi" tab.
Tap "Scan" and, the first time, grant the permission.
Scroll through the list and the channel charts.
Tap "Save" to keep the scan together with the place where you ran it.
You need
Wi‑Fi turned on.
Location permission; on Android 13+ also "Nearby Wi‑Fi devices".
Limits
6 GHz networks appear in the list, but the charts and the channel recommendation cover only 2.4 and 5 GHz.
The recommendation has to be applied by hand in the router's settings.
Your saved Wi‑Fi scans, each with its place on a map, to reopen or delete. Handy to compare the airwaves in an office before and after a channel change.
How to use it
"WiFi" tab → clock icon "History".
Tap a scan to reopen it, or delete it.
You need
Location permission when saving, otherwise you see "Location not recorded".
05
Tools
The tab with everything else, grouped by purpose. Every tool that produces a result has "Share" at the bottom: the summary goes into the message text, with a CSV and, for charts, a PNG image attached. "Password check" and "Wake-on-LAN" are left out on purpose.
From the ⓘ icon at the top, an instant summary of your connection: the phone's IP, subnet, gateway, DNS and interface; for Wi‑Fi the SSID, signal, channel and link speed; for the internet the status, public IP, reverse DNS, ISP, location and time zone. From here you open "Internet monitor" and "Network timeline".
How to use it
Tap the ⓘ "My network" icon in the top bar.
You need
Internet for the public part, which is fetched from ipinfo.io.
An interactive SSH terminal to servers, switches and routers, with saved hosts, Tab completion and one-tap quick commands. On the first connection it remembers the server's key and refuses to connect if it later changes.
How to use it
"Tools" → "SSH" → "New connection".
Enter "Host", "Port", "Username", "Password" and, if you like, "Label (optional)"; tick "Save this connection" and, if you want, "Remember password".
Tap "Connect", type in the command field and tap "Send"; "Complete" acts as Tab.
Use the quick commands: a Linux set (uptime, df -h, free -h, ss -tulpn, systemctl --failed…) and a Cisco-style "Switch / router" set (show version, show interfaces status, show vlan brief…). They are all read-only; "Edit before running" lets you change them.
From a saved host's menu, "Add to Home screen" creates a shortcut.
From a device's open port 22, "Connect" opens the terminal directly.
Limits
In the terminal you sign in with a password (keyboard-interactive included); private-key sign-in is available only in the Linux inventory.
Remembered passwords are encrypted on the phone and do not travel with backups.
Browse and transfer files over SFTP, FTP and FTPS: upload, download, create folders, rename and delete. Connections can be saved and pinned as shortcuts on the Home screen.
How to use it
"Tools" → "File transfer".
Pick the protocol, enter host and port (22, 21 or 990 by default), "Username" and "Password", or "Anonymous".
Tap "Connect" and use "Upload", "Download", "New folder", "Rename", "Delete".
If you use it often: "Save this connection", "Remember password", "Add to Home screen".
Limits
Over SFTP the server key is checked as in the SSH terminal; over FTPS the certificate is accepted on the first connection and remembered, with a warning if it changes.
Runs a traceroute and places each hop on an OpenStreetMap map, starting from where you are, so you can see your packets' path across the world.
How to use it
"Tools" → "Traceroute map".
Enter a host and tap "Run".
You need
An internet connection.
Location permission, optional, for the starting point.
Limits
The location of public hops is looked up online at ipinfo.io, which therefore receives their IP addresses; hops inside private networks never leave the phone.
Locations are approximate; a hop without a reliable location stays in the list but off the map.
Sends continuous ping requests to a host until you stop it, and shows the last round-trip time, a chart, min, average and max, jitter, packet loss percentage and the raw output.
How to use it
"Tools" → "Ping": the host is prefilled with the gateway.
Change it if you like and tap ▶; ■ to stop.
Limits
It uses the system ping command, which may be restricted on some Android versions.
Keeps an eye on hosts, IPs or web addresses: "UP" or "DOWN" status, latency, HTTP code, and days until the certificate expires when fewer than 30 are left. It notifies you when a host goes down, when it comes back, and when its certificate is about to expire.
How to use it
"Tools" → "Host monitor".
Type "Host, IP or URL" and tap "Add".
Tap ↻ for an immediate check.
You need
Notification permission for the alerts.
Limits
Background checks follow the monitoring frequency (1 to 24 hours) and Android's battery-saving rules: they may arrive late.
Measures download, upload and ping over several parallel connections, discarding the first seconds so the result is not inflated, and keeps a history with a chart. With "Automatic speed test" it repeats on its own every 6, 12 or 24 hours.
How to use it
"Tools" → "Speed test" → "Start".
For periodic measurements pick the frequency with the "Automatic speed test" chips.
Limits
The test uses Cloudflare's servers (speed.cloudflare.com).
The automatic one runs only on Wi‑Fi and when the battery is not low.
07
Tools: security
How solid the network you are on is, and what to fix.
Gives the network you are connected to a grade from 0 to 100, with a letter, based only on what can be measured: Wi‑Fi encryption and WPS, the router (factory credentials, admin page without a password, ports opened by UPnP), what the internet sees of your public IP (reachable ports and known vulnerabilities), DNS honesty and TLS integrity. It lists "What costs points" with a fix for each, and the areas it could not measure are declared as "Not measured". "Share the card" creates an image with no data that identifies the network.
How to use it
"Tools" → "Network grade" → "Run".
Read the items and apply the suggested fixes.
If you like, "Share the card".
Limits
To check the router, the grade automatically tries a few common factory logins on its admin page. Run it on networks you manage.
Your public IP is sent to Shodan InternetDB (internetdb.shodan.io) and ipinfo.io to learn what is visible from outside.
Answers "Is this network safe to use?" for networks you do not manage, such as hotels or airports. It checks "Public exposure" (what the internet already knows about your address), "DNS integrity" (whether the resolver answers honestly for well-known names) and "TLS interception" (whether someone decrypts your traffic on the way out). It does not scan or attack anything.
How to use it
"Tools" → "Hostile network check" → "Run".
Read the outcome of the three checks.
Limits
Each one may come back as "Could not be checked", for example if the network blocks the test connections.
Your public IP is sent to Shodan InternetDB and ipinfo.io.
Looks for the typical problems of the network you are on: open Wi‑Fi, WEP, legacy WPA or WPS enabled, possible "evil twins" (networks imitating yours), insecure networks nearby, and ARP anomalies such as the same MAC on several addresses or possible gateway spoofing (a man-in-the-middle attack).
How to use it
"Tools" → "LAN threat scan" → "Analyze network".
You need
Wi‑Fi on and location permission for the Wi‑Fi part.
It is an advanced feature.
Limits
The ARP analysis depends on how much of the neighbour table Android lets apps see, restricted since Android 10.
A reassigned DHCP address can trigger a false alarm.
Looks for item trackers (Apple Find My and AirTag, Samsung SmartTag, Tile, Google/Eddystone beacons) and flags those that stay near you long enough to look like they are following you.
How to use it
"Tools" → "Tracker scan" → "Scan".
Keep it running and move around: the scan lasts as long as you stay in the tool.
You need
Bluetooth on; "Nearby devices" permission (Android 12+) or location.
Limits
Trackers change address often: the same item may appear more than once.
It cannot tell your own trackers from a stranger's.
Queries the router over UPnP, without root, and shows the external IP, whether UPnP is on and which port forwards are open to the internet, highlighting sensitive services. Separately, and only after you confirm, it tries the most common default credentials on the admin page.
How to use it
"Tools" → "Router security" → "Analyze router".
If you want, tap "Test default credentials" and confirm with "Proceed".
You need
It is an advanced feature.
Limits
If UPnP is off there is nothing to read.
The credential test covers only admin pages using HTTP Basic authentication and a list of common logins.
08
Tools: inspect a domain
A domain's DNS, registration, certificates and mail.
Shows a domain's A/AAAA addresses and reverse name (PTR), and below them the records of the type you choose (A, AAAA, MX, TXT, NS, CNAME, SOA, SRV, CAA, PTR), each with a short explanation.
How to use it
"Tools" → "DNS lookup".
Type the domain and tap "Resolve".
Pick a record type from the menu and tap "Resolve" again.
Limits
Records by type are asked of the public resolver 1.1.1.1.
Connects to a host and shows the certificate's subject, issuer, validity, protocol and cipher. It warns if the certificate has expired or is about to, is self-signed, does not match the hostname, if the server accepts obsolete TLS versions, or if HSTS is missing.
How to use it
"Tools" → "TLS certificate".
Type host:port, for example 192.168.1.1:443, and start.
Limits
Some obsolete TLS versions cannot be tested from the phone: the app says so when that happens.
Passive checks on a domain's mail and footprint: SPF, DMARC, DKIM on common selectors, mail servers (MX) and subdomains found in the public certificate logs (Certificate Transparency).
How to use it
"Tools" → "Domain recon".
Type the domain and start.
Limits
A DKIM key may exist on an uncommon selector and escape the check.
Subdomains are looked up at crt.sh.
09
Tools: local network and router
The router, the addresses and the devices to wake.
Public IP, hostname, ISP, location, time zone, status and latency of your connection, plus local IP, subnet, gateway, DNS and IPv6. The "Map" button shows the estimated location.
From an IP address and a prefix it works out network, netmask, wildcard, broadcast, first and last host, number of usable hosts and class. Everything happens on the phone.
Turns on a computer remotely by sending a "magic packet" to its MAC. The devices you add from their details appear in "Devices to wake", with "Wake all" to start them together.
How to use it
"Tools" → "Wake-on-LAN".
Enter the MAC and tap "Wake", or use "Wake all" on the list.
You need
Wake-on-LAN supported and enabled on the device to wake.
Limits
It works on the local network you are connected to.
Shows the cell you are attached to and the neighbouring cells: operator, band, channel, frequency, signal, quality, area code, cell ID, physical cell ID and roaming, plus whether the connection is "Metered", whether "Data Saver" is on, and the traffic received and sent since the phone booted. It transmits nothing.
How to use it
"Tools" → "Mobile network".
You need
A phone with a mobile radio and location permission.
Limits
On some devices the radio does not report cells until the screen turns back on after airplane mode.
Measures the Wi‑Fi signal room by room: for each room it records the signal in dBm (from "Weak" to "Excellent"), SSID and band of the network you are connected to, so you can find the dead spots at home or in the office.
Computes MD5, SHA‑1, SHA‑256, SHA‑512 and CRC32 of a text, ready to copy with one tap. "Identify a hash" recognises the likely algorithm of a pasted hash. Everything happens on the phone.
How to use it
"Tools" → "Hash generator".
Type text in "Text to hash", or paste a hash in "Identify a hash".
Rates a password's strength (from "Very weak" to "Very strong"), its bits of entropy and the estimated time to crack it. "Check Have I Been Pwned" tells you whether it appears in known breaches without sending it: only the start of its SHA‑1 fingerprint leaves the phone (k-anonymity).
How to use it
"Tools" → "Password check".
Type the password and read the rating.
If you want, tap "Check Have I Been Pwned".
Limits
It has no "Share" button, on purpose.
12
Settings and saved networks
The networks NetBlade remembers, alerts, archives and preferences.
The list of networks you have named, with the number of devices, monitoring status, how many PCs were read or refused the inventory, and a summary of known vulnerabilities ("N CVE · M PC", with the machines each flaw sits on). For each network you set shared credentials and scheduled inventory.
How to use it
Tap the router icon in the top bar ("Saved networks").
In "My devices" you see the remembered devices and remove them with "Forget".
When editing you find: name, "Monitor this network", "Scan this network when the app opens", "Devices from router (SNMP)", "Windows PCs on this network" (credentials for all PCs), "Linux machines on this network" (shared SSH credentials) and "Scheduled inventory": "Off" or every 6, 12 or 24 hours.
The map icon at the top opens the "Network map" with the networks whose location is known.
You need
At least one named network ("LAN" tab → ⋮ → "Name network").
Limits
Scheduled inventory acts only on the network the phone is connected to at that moment; if you set different intervals on several networks, the shortest one applies.
At regular intervals NetBlade scans the saved networks that have monitoring on and alerts you about new devices and, if you want, about known devices joining and leaving. "Security alerts", high priority, fire when a new device looks like a camera or exposes risky services. It also records internet availability and the state of the "Host monitor" hosts, and with scheduled inventory it tells you when defences drop on your PCs (antivirus, firewall or encryption off, new administrator, disk almost full).
How to use it
Name the network and turn on "Monitor this network".
"Settings" → "Monitoring" → turn on "Background monitoring" and pick the "Check frequency": 1, 3, 6, 12 or 24 hours.
Turn on what you need: "Notify on known network", "Presence alerts", "Security alerts", "Quiet hours" (security alerts still ring).
"Check now" runs a check immediately and tells you why something does not start, for example if the network is not saved or not monitored.
To silence a single device use "Mute this device" in its details.
You need
Notification permission (Android 13+); if notifications are off the app says so and opens the right settings.
The phone connected to the monitored network.
Limits
Android may delay or skip background checks to save battery: excluding NetBlade from battery optimization helps.
Alerts cover only the network you are connected to.
If in the background NetBlade cannot tell for sure which saved network you are on, it skips the check rather than attribute events to the wrong network.
The timeline of what happened: new devices, devices joining and leaving, hosts up and down, internet lost and restored, connections to the network, and events from inventoried PCs (inventory refused, new local administrator, disk almost full, security updates due, firewall, antivirus or encryption off, new share, new startup item, account enabled, new listening port).
The archive of scans saved from LAN, Ports and WiFi. From here you export them as CSV, JSON or a paginated PDF report with summary, findings and details, or delete them.
How to use it
"Settings" → "Saved scans".
Tap the share icon on a scan and pick the format.
You need
Exporting is an advanced feature; sharing the result of individual tools is not.
"Export backup" saves all your data (scans, networks, devices, settings) to a file, and "Restore from file" puts it back, for example on another phone. "Automatic backup" does it on its own into a folder you choose, daily, every 3 days or weekly, keeping the number of copies you decide and showing the result of the last one.
Choose the app language among 43 or keep "System default"; the theme "System", "Light" or "Dark"; "Dynamic colors (Material You)" on Android 12+ or an "Accent color". Below that you tune the scans: ping timeout (100–2000 ms), parallelism (8–128 threads), reverse DNS and vendor lookup for the LAN; connection timeout (100–1500 ms) and default range for ports; default CSV or JSON format for exports. "Clear archive" deletes all saved scans.
How to use it
Open "Settings" and scroll through "Language", "Appearance", "LAN scan", "Port scan", "Export" and "Data".
Limits
A lower timeout and more threads make the scan faster but can miss devices that are slow to answer.
On the Home screen you can add the "Quick scan" widget, which opens NetBlade and starts the LAN scan, and the "Network info" widget with local IP, subnet, gateway, DNS and public IP, refreshed when the network changes, every 30 minutes and on tap. Quick Settings has a "Quick scan" tile, and saved SSH and FTP connections can become shortcuts.
How to use it
Long-press the Home screen → Widgets → NetBlade.
For the tile, edit Quick Settings and drag in "Quick scan".
Limits
The "Network info" widget fetches the public IP from ipinfo.io.
In "Settings" → "Info" you find the app version, "Report a problem" (an email prefilled with your device details), "Rate NetBlade", "Open-source licenses" and the "Privacy policy".
How to use it
Open "Settings" and scroll down to "Info".
13
Free and advanced features
How NetBlade is paid for, and what always stays free.
NetBlade is free with a banner ad above the navigation bar. The LAN scanner, ports, WiFi, SSH, file transfer, monitoring, saved networks, backup and every tool except those listed below are free with no conditions.
Limits
In regions where it is required, the app asks for consent before showing ads; you can change it later in "Settings" → "Info" → "Privacy options".
Seven features are advanced: "Windows inventory", "Linux inventory", "Vulnerability check" (the programs' CVEs), exporting "Saved scans", "LAN threat scan", "Router security" and "SNMP details". When you open one without having unlocked it, NetBlade offers the two routes below.
A one-time purchase in the Play Store, at the price shown in the Play Store, removes the banner, skips the ad consent prompt and unlocks the advanced features. It is not a subscription.
How to use it
"Settings" → "Enjoying NetBlade?" → "Remove ads".
Complete the purchase with Google Play.
Limits
The purchase is tied to your Google account: reinstalling with the same account restores it automatically.
If the purchase is refunded, the unlock is withdrawn and the app tells you.
Scans, devices, saved networks, inventories and timeline are stored only in the app's database on your phone. There is no account and NetBlade does not send your data to the developer: there is no server of ours.
Some tools have to ask outside what your connection looks like, and they do so only when you use them. ipinfo.io receives your public IP for "Internet", "My network", the "Network info" widget, "Network grade" and "Hostile network check", and for the "Traceroute map" also the public IPs of the hops. Shodan InternetDB (internetdb.shodan.io) receives your public IP for "Network grade" and "Hostile network check", which also open test connections to cloudflare.com, dns.google and one.one.one.one.
"DNS lookup", "WHOIS & DNS" and "Domain recon" send the domain you ask about to the 1.1.1.1 resolver, WHOIS servers and crt.sh. "Check Have I Been Pwned" sends only the first characters of the password's SHA‑1 fingerprint, never the password. The "Known vulnerabilities" check sends NVD only the name and version of recognised programs, and only after your consent; the "Search CVE" link instead opens a search in your browser.
The "Speed test", including the automatic one if you turn it on, exchanges test traffic with Cloudflare's servers (speed.cloudflare.com). Maps download from OpenStreetMap the tiles you view. The hosts you point the tools at, for ping, SSH, file transfer, certificates or "Host monitor", receive the ordinary traffic addressed to them.
If you see ads, Google AdMob receives advertising identifiers according to Google's rules and the consent you gave, which you can change from "Privacy options". If you buy "Remove ads", the purchase and its verification go through Google Play and ads are no longer loaded.
The Windows, SSH and FTP passwords you choose to remember are encrypted with the Android Keystore and never leave the phone, not even in backups. Credentials used to list SMB shares stay in memory only. The SNMP community and credentials, on the other hand, are stored unencrypted in the database, so a restore brings them back without re-entering them.
The app's database is included in your Google account backup (cloud backup and transfer to a new phone), so your scans, networks and devices follow you. It stays in your Google account, encrypted by Google, and includes the SNMP credentials; passwords encrypted with the Keystore are left out. The backup file you export from the settings follows the same rule.