NetBlade for iPhone and iPad finds the devices on your network, queries routers and switches over SNMP, reads the inventory of Windows and Linux PCs and puts a network toolbox in your pocket. This guide follows the app's tabs in the order you meet them, and for each feature says what it does, how to use it and where iOS draws a line.
NetBlade is on the App Store and is the same app for iPhone and iPad. It needs iOS 17 or later. It is free, has no ads, and speaks 43 languages: it follows the language set in iOS.
You need
iPhone or iPad with iOS 17 or later
A Wi‑Fi connection to the network you want to look at
iOS asks every app for permission to talk to devices on the local network, and it asks only once. On first launch the «Welcome to NetBlade» screen explains what the permission is for before the system prompt appears: without it the scan finds nothing.
How to use it
Open NetBlade and tap «Get started».
When iOS asks to find devices on your local network, tap Allow.
If you said no, go to iOS Settings › Privacy & Security › Local Network and turn NetBlade on.
You need
Local Network permission granted
Limits
iOS does not tell apps whether the permission was granted: if a scan comes back empty on a busy network, check this setting first.
When you open the LAN tab the first scan starts by itself, and the device list fills in as answers arrive. To read the Wi‑Fi network name (SSID) iOS also asks for location permission, only while using the app; if you decline, the network is recognised by its subnet.
How to use it
Open the LAN tab and wait for the scan to finish.
Read the «Scan summary» that opens at the end, then close it.
If your router supports SNMP, save the network and enter the community: MAC addresses and vendors will follow.
You need
Local Network permission
Location permission «while using the app», only to see the SSID
02
LAN
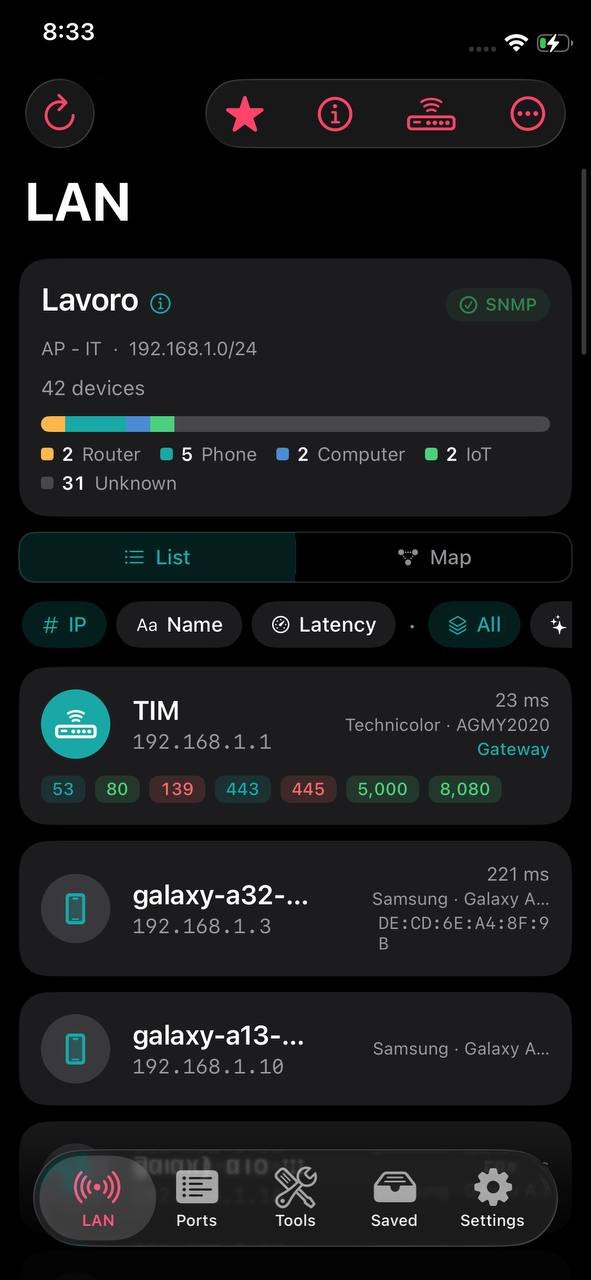
The tab where almost everything starts: who is on the network, how it is wired, and what is known about each device.
Finds the devices on the subnet the phone is connected to and shows, for each one, name, IP, latency, vendor and model when known, its role (Gateway or This device) and open ports as pills coloured by risk. Names come from several sources (reverse DNS, Bonjour, NetBIOS, UPnP, SNMP) and the most reliable one wins. The NEW badge marks devices that were missing from the previous scan.
How to use it
Tap «Scan» to run the scan again; while it runs the button becomes «Stop».
Follow the progress bar, the count of devices found and the timer.
At the end the «Scan summary» opens: it says whether the router answered over SNMP and that names, vendors and MACs are still coming in.
Sort by «IP», «Name» or «Latency» and filter «All», «New» or «Open ports».
From the ⋯ menu you can «Save scan», «Share», «Scan another subnet…» (for example 192.168.0.0/24) and «Retry MAC (SNMP)».
Tap a device to open its details.
You need
Local Network permission
Limits
iOS lets no app read the MAC addresses of its neighbours. MAC and vendor come from the router or switches over SNMP, or from devices that announce their own (AirPlay devices, for example). Without SNMP the list is real but has no MACs, and the shared report says so.
No ICMP ping sweep as on Android: a device's presence is proven with TCP connections, and a device that answers nothing may not appear.
The LAN tab's title is the saved network's name, or the subnet if you have not saved it; below it you see SSID, subnet and a coloured bar with the mix of device types. The «SNMP» chip is green if something answered and amber if not: tapping it while amber opens the network settings, where you enter the community.
How to use it
Look at the «SNMP» chip after the scan.
If it is amber, tap it and enter the router's community or v3 credentials.
The same scan drawn as a structure. On a home network it is a star around the router; with managed switches that answer SNMP (LLDP and bridging tables) it becomes a tree showing what is plugged into which port. Corrections you make by hand take precedence over what SNMP says.
How to use it
After a scan choose «Map» in the «List» / «Map» picker.
Tap a node to «Open details», «Mark as switch», «Not a switch» or «Detach».
Tap «Rebuild» to redraw the map.
You need
SNMP enabled on the switches to see the real structure
Limits
A device without a MAC cannot be placed on the map.
Without managed switches the network appears as a single segment.
A sheet with everything known about the network you are on: address, subnet, gateway, DNS in use, link type and interface; for Wi‑Fi the SSID, BSSID and security; for the Internet status, public IP, reverse name, ISP, location and time zone.
How to use it
Tap the LAN tab's title or the ⓘ «This network» icon.
Limits
Wi‑Fi signal, channel and link speed are not available to apps on iOS, not even for the connected network: the sheet says so instead of showing a value.
Everything about one device: IP, MAC, vendor, model, operating system, hostname, latency, role, first seen and last seen. Here you can give it a name, a tag, notes and an icon, and query it in several ways; «Remove personalization» goes back to the scan data.
How to use it
Tap a device in the list or on the map.
«Open ports» rescans itself when the page opens; tap «Rescan» to repeat.
«Identity» › «Ask this device» queries NetBIOS, the web server banner and the ping TTL, without sending anything outside your network.
«Query device over SNMP» shows system, interfaces, VLANs, storage, CPU and printer data; tap an interface for live traffic.
«Sharing and services» lists the recognised services (SMB, NFS, AFP, FTP, Plex, AirPlay, Printer, RDP, VNC, SSH, Web, MQTT, DNS, SNMP) with a guess at the device type.
«Security» gives a score out of 100 from the open ports, with advice; «Posture» shows known vulnerabilities from the last inventory, if you ran one.
Use «In wake list» and «Wake now» for Wake‑on‑LAN; «Show QR code» and «Share» pass on the device summary.
«Credentials (this device)» overrides the network's SNMP, Windows or SSH credentials for this machine only.
Limits
Without SNMP, MAC and vendor are not directly visible on iOS.
The Windows and Linux remote inventory, opened from here, is a Pro feature.
Saving the network gives it a name, stores the SNMP credentials and, once only, its location for the networks map. From then on every scan reads the router's ARP table, so MACs and vendors arrive, and the network timeline records what changes. SNMP is read-only: nothing is changed on the router.
How to use it
On the LAN tab open the ⋯ menu and choose «Save this network».
Give the network a name.
Turn on «Devices from router (SNMP)» and pick v1/v2c or v3.
For v1/v2c enter the community (often public); for v3 the user, authentication (MD5 or SHA) and privacy (DES or AES).
Save: NetBlade immediately retries fetching the MACs.
You need
SNMP enabled on the router or switches
Limits
The free version saves one network; from the second one on you need NetBlade Pro.
03
Ports
A port scanner with service descriptions and risk levels.
Probes a host and lists its open ports with service, description and risk level (info, low, medium, high). After the TCP pass it also sends real UDP probes to services such as DNS, NTP, TFTP, mDNS, NetBIOS and SNMP. Next to each port, «Search CVE» opens a search on the National Vulnerability Database website.
How to use it
Type a host or IP, or tap «Use gateway».
Choose the range: «Common», «1–1024» or «Custom» (for example 22,80,443 or 1-1024).
Tap «Scan ports».
Share the result with the button in the top bar.
You need
Local Network permission for hosts on your network
Limits
Scan only hosts you own or are authorised to test.
04
Tools
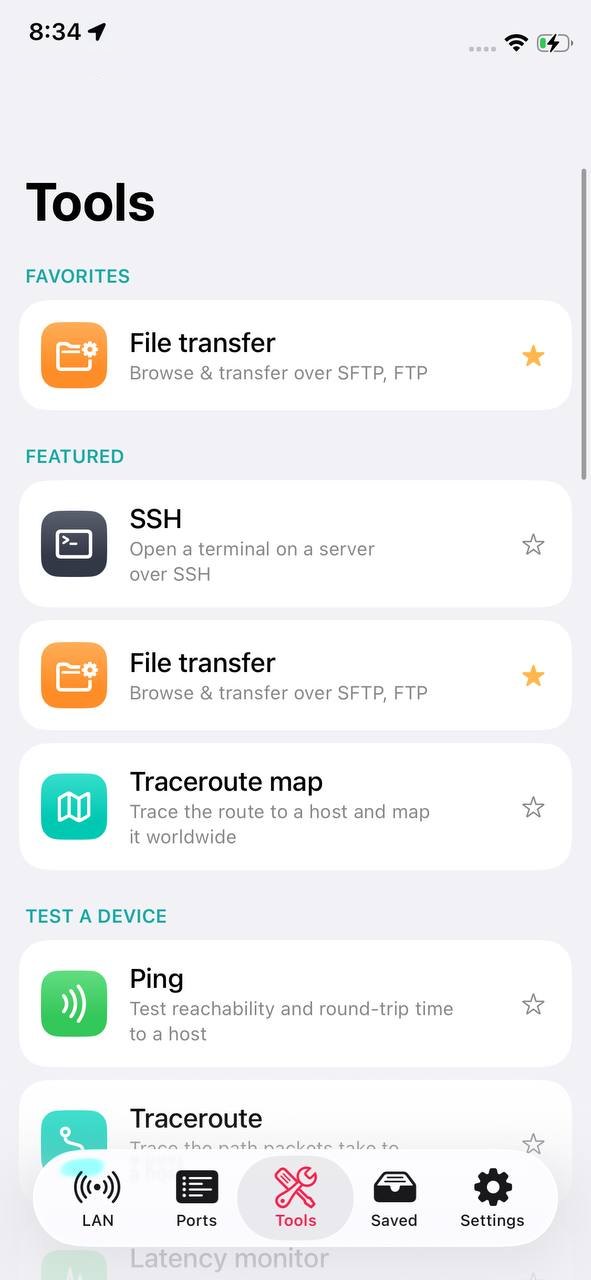
Tools are grouped into Featured, Test a device, Security, Inspect a domain, Local network & router, Wireless & discovery and Utilities. Tap a tool's star to put it in «Favorites» at the top of the list and in the favourites menu of the LAN and Ports tabs. Almost every tool has Share in the top bar: the result as text, plus a CSV file and, for ping, monitors and speed test, the chart as an image.
Connects to a server, switch or router and runs commands. Hosts can be saved, with the optional password in the Keychain; there are read-only command shortcuts for Linux and for switches and routers, and the «Complete» button works as the Tab key. The host key is pinned on first connection and a different key is refused.
How to use it
Open Tools › SSH.
Enter host, port, user and password; turn on «Remember password» or «Save this host» if you need them.
Tap «Connect».
Type a command or tap a shortcut; with «Edit before running» you can adjust it first.
Tap «Disconnect» to close.
If a server was reinstalled and its key changed, the connection is refused and both fingerprints are shown. The app has no way yet to accept the new key.
Limits
Commands run one at a time: full-screen programs such as top, vi or less do not work, because iOS offers no full interactive terminal.
Browses a remote machine over SFTP, FTP or FTPS (explicit or implicit) and moves files both ways: upload, download, rename, delete, create folders. An FTPS server's certificate is pinned on first connection.
How to use it
Choose the «Protocol».
Enter host, port and user and password, or choose «Anonymous».
Turn on «Save this connection» if you will use it again.
Tap «Connect» and browse the folders.
Limits
FTP sends passwords and files in clear text, and the app reminds you: use SFTP when you can.
A traceroute where every public hop is geolocated and drawn as a numbered pin on a world map. Private hops, which have no location, stay in the list below the map.
How to use it
Type a host and start the trace.
Follow the pins on the map and the list of hops.
Limits
The location is where the address is registered, not necessarily where the router physically is.
Pings a host until you stop it, draws every reply on a chart and counts replies and lost packets. The result can be shared together with the chart image.
One ping per second to a host, with the last 60 samples as bars (losses in red) and minimum, average, maximum, jitter and loss. Useful to see whether a connection is unstable while you watch it.
How to use it
Type a host, or leave it empty to use the gateway.
Measures latency, download and upload and shows them on a speedometer as they are measured. Every result goes into «History» with the network and provider. The test server is Cloudflare's.
How to use it
Tap «Start test».
Look at earlier tests in «History».
Limits
iOS does not allow a speed test in the background: the only tests are the ones you start.
A score out of 100 for the network you are on, with a «What costs points» list and the fix for each item. It looks at router security (factory logins, admin page without a password, UPnP), your public IP's exposure on the Internet (ports and known vulnerabilities, according to Shodan InternetDB) and path integrity, meaning whether DNS answers honestly.
How to use it
Open Tools › Network score and run the check.
Read the items that cost points and the suggested fixes.
Limits
Wi‑Fi encryption, WPS and TLS interception are not part of the score because iOS does not expose them: they are left out, not counted as passed.
Answers the question «is this network safe?», built for hotel, airport and café Wi‑Fi. It checks for a captive portal, the connected Wi‑Fi's encryption, whether the gateway is reachable, DNS integrity, public IP and provider, and Internet exposure, then gives an overall verdict with the details.
How to use it
Connect to the network you want to check.
Open Tools › Hostile network check and run it.
Limits
Gateway ARP spoofing and TLS interception are marked as not available on iOS.
Looks for signs of ARP spoofing, meaning one MAC answering for several IP addresses, by comparing the phone's neighbour table with the router's table read over SNMP, and warns you if you are on an open or WEP Wi‑Fi network. Nothing is sent to the hosts.
How to use it
Open Tools › LAN threat scan and run it.
You need
SNMP set up on the saved network, for the comparison with the router
Limits
No evil twin detection and no exposed nearby networks: iOS cannot scan access points.
Two checks on your router. The first lists active UPnP mappings, meaning ports some device has opened to the Internet. The second, «Probe default logins», tries a short list of factory credentials on the admin page, and runs only after you explicitly confirm.
How to use it
Open Tools › Router security.
Read the UPnP mappings.
If you want, tap «Probe default logins» and confirm.
Limits
Use it only on networks you own or are authorised to test.
Looks for AirTags, SmartTags and Tiles travelling with you and warns you if one stays close for a long time. Keep the app open and move around: movement is what tells a tracker following you from one that just happens to be there.
How to use it
Open Tools › Tracker scan and start it.
Keep the app open while you move.
You need
Bluetooth permission
Limits
It is a best-effort check: trackers change their Bluetooth identity about every 15 minutes, and the app cannot tell your own tag from someone else's.
Sums up gateway, subnet, the phone's IP and DNS in use, and «Open web interface» takes you to the router's admin page, with the advice to change the factory credentials.
Reads the ARP table of a router or switch over SNMP and recovers the IP and MAC pairs that iOS hides from apps. It is the most direct way to know who is really on the network.
How to use it
Enter the router's IP (usually the gateway) and the community.
Shows your public IP, provider and Internet connection status, together with the local side. The location shown is where the address is registered, not where you are.
How to use it
Open Tools › Internet: the lookup starts right away.
Switches a computer on remotely by sending it the magic packet. You can wake one by entering its MAC, or use «Wake all» for the wake list you built from the device pages. The screen tells you which routes the packet was sent on.
How to use it
Enter the MAC; broadcast address and last known IP are optional.
Tap «Wake», or «Wake all» for the wake list.
You need
Wake‑on‑LAN enabled in the computer's BIOS/UEFI and network card
Limits
On iOS, sending broadcast packets requires a special permission from Apple. When it is not available NetBlade sends the packet straight to the last known address, which wakes the machine as long as the switch still remembers it: in practice for a few minutes after shutdown.
Queries a device over SNMP v1, v2c or v3: system information, interfaces with live traffic, VLANs, storage, CPU, printers (toner and pages) and ARP table. On iPhone SNMP is free, because it is how MACs and vendors reach the app.
How to use it
Enter host and community.
Tap «Query».
You need
SNMP enabled on the device; for v3, the credentials saved with the network
Measures a password's strength (bits of entropy and estimated time to crack it) and with «Check Have I Been Pwned» checks whether it appears in a known breach. Only part of the hash leaves the phone, never the password.
Limits
There is deliberately no Share button: next to a password field it would be an invitation to send it.
From a device's page it reads a PC's inventory without installing anything on it. For Windows, over WinRM: system and uptime, hardware, services, updates, local accounts, startup items, network adapters, disks, installed software and the «Defenses» (antivirus, firewall per profile, BitLocker per volume, TPM). For Linux, over SSH: distribution and kernel, CPU and memory, disks, services and listening ports, users, containers, packages and updates, firewall, SELinux and AppArmor.
How to use it
Open the device's page, tap «Remote inventory (Windows / Linux)» and choose the system.
For Windows, prepare the PC once, in an administrator PowerShell: Enable-PSRemoting -Force. With a local account in a workgroup you also need the command the app shows under «How to get more data», with a button to copy it.
Enter user, password and, for Windows, the domain (empty for a local account); for Linux also the port.
Tap «Read this PC». If something fails the app explains why and shows the command that fixes it.
You need
Windows: WinRM on port 5985 and an account allowed to log on over the network, usually a local administrator
Linux: SSH access with a regular user; commands are read-only and do not use sudo
Limits
iOS has no SMB client: no shared folders or user profiles, and program versions come from the Windows registry, complete but less exact than versions read from the program file.
For the programs in a Windows inventory that NetBlade recognises exactly, it asks the National Vulnerability Database for the CVEs of that precise version and shows them worst first, with CVSS score and link. The summary also appears in the device's «Posture» and in saved networks. Answers are kept for a week.
How to use it
Go to Settings › «Vulnerability check».
Turn on «Check software for known vulnerabilities».
If you like, enter a free «NVD API key (optional)»: without a key NVD allows 5 requests every 30 seconds, with one 50.
Read, or read again, a Windows PC's inventory.
Limits
It runs only if you turn it on. Only the name and version of recognised programs go to NVD, never the machine's name, its address or who uses it.
Only programs NetBlade can match with certainty to the right database entry are checked.
Pro feature.
05
Saved
Saved networks, their timeline, saved scans and the networks map.
Each saved network opens a page with its «Network timeline», name and notes, SSID, BSSID, date and which credentials are set. From here «Credentials» opens a single editor for SNMP, Windows (WinRM) and Linux (SSH), and «Forget this network» deletes it together with all its credentials. On the LAN tab, the «Saved networks» icon shows the same networks as cards, with last scan, SNMP status, inventoried PCs, vulnerabilities and the devices.
How to use it
Tap a saved network.
Open «Credentials» to change them, or «Forget this network» to remove it.
Limits
One saved network is free; from the second one on you need NetBlade Pro.
For each saved network it records what changed between one scan and the next: devices that are new, came back or left. From PC inventories it adds antivirus, firewall or encryption turned off, reduced protections, enabled accounts, new startup programs, new administrators, new ports, disks nearly full and pending updates. Events are grouped by day and can be cleared. On iPhone this is what takes the place of alerts.
How to use it
Save the network.
Run a scan: the first one only creates the baseline.
After later scans open Saved › the network › «Network timeline».
Limits
Events are recorded when you scan: a gap in the timeline means nobody scanned, not that nothing happened.
Saved networks with a location appear as pins on a map; the screen also tells you how many it could not place. The location is taken once, when you save the network.
06
Settings
App preferences, subscription, lock, backup and data.
The app's language follows the one chosen in iOS Settings, where you can change it for NetBlade alone. Under «Appearance» choose the theme (System, Light, Dark) and the accent colour.
They tune the scans: for the LAN «Probe timeout», «Parallelism», «Resolve host names (reverse DNS)» and «Look up vendor from MAC»; for ports «Connect timeout» and the default range (Common, 1–1024 or all).
Limits
«Look up vendor from MAC» only affects devices whose MAC arrives over SNMP.
«Export» creates a file with networks and timeline, devices with their names, scans, speed tests and settings; «Restore» imports it again, adding whatever is missing. «Automatic backup» writes a copy to a folder you choose, for example on iCloud Drive, daily, every 3 days or weekly, keeping as many copies as you decide; the copy is written when you open and when you leave the app.
How to use it
Settings › «Backup» › «Export», or set up «Automatic backup» by choosing a folder and a «Frequency».
On another device use «Restore» and pick the file.
Limits
Passwords and SNMP credentials never go into the backup file: they stay in the device's Keychain and must be entered again.
The small «Scan LAN» widget opens the app on the LAN tab and starts a scan. The medium «Network» widget shows address, subnet, gateway, DNS and public IP, refreshed about every half hour.
How to use it
Touch and hold the Home Screen, tap Edit › Add Widget and search for NetBlade.
Touching and holding the NetBlade icon shows the last four saved SSH and file transfer hosts: tapping one opens the tool already connecting.
08
What's different from Android
NetBlade for iPhone is not a copy of the Android version: where iOS cannot do something, the app says so on the screen where it would be, with no switches that do nothing and no invented numbers.
On iOS the system ARP table is closed to apps, so MACs and vendors come from the router or switches over SNMP. That is why SNMP is free on iPhone, while on Android it is an extra: without it the free app would have no vendors and no map.
There is no Wi‑Fi tab as on Android, no Wi‑Fi history and no room survey: iOS offers no API to scan nearby access points, and an app only knows the network it is connected to. This is a decision, not a feature on the way.
On iOS there is no background monitoring, no alerts, no quiet hours, and no scheduled speed tests or inventories. iOS decides by itself when to wake an app, maybe every hour, maybe once a day, and does not say whether it did: a notification that may arrive hours late is not a smaller version of the feature, it is something else that looks enough like it to be believed. The same question, what changed on my network, is answered by each saved network's timeline when you open the app. The iPhone app is a tool you open, not a guard you leave running.
iOS has no SMB client, so Windows PC inventory goes through WinRM only: no shared folders or user profiles, and program versions come from the registry instead of the program file.
Mobile network without serving cell, signal or neighbouring cells; «This network» without Wi‑Fi signal, channel and speed; security checks without evil twin detection or nearby networks, and a network score that leaves out Wi‑Fi encryption and WPS. Every screen says what is missing and why.
On Android NetBlade is free with ads; on iPhone and iPad there are no ads and the advanced features are in NetBlade Pro. Purchases do not carry over between platforms: each store handles its own.
09
Free and NetBlade Pro
NetBlade is free and has no ads; NetBlade Pro adds the features for people who look after networks and PCs.
LAN scan and network map, device details, port scanner, SNMP and Devices from the router, Ping, Traceroute, Traceroute map, DNS, WHOIS, TLS certificate, Router, Internet, Mobile network, Subnet calculator, Wake‑on‑LAN, Speed test with history, Network score, Tracker scan, Bluetooth LE, Bonjour, Hashes, Password, one saved network with its timeline, saved scans, sharing tool results, App Lock and the widgets.
Windows inventory, Linux inventory, Vulnerability check, Export and PDF reports of saved scans, LAN threat scan, Router security, Hostile network check, Domain recon, SSH terminal, File transfer, Latency monitor, Host monitor, Unlimited saved networks and history, Backup and restore. Tapping a Pro feature shows a card naming the feature and leading to the plans.
NetBlade Pro is a monthly or yearly subscription: USD 1.99 a month or USD 8.99 a year, or the equivalent in your currency. If your Apple account is eligible, it starts with a 3-day free trial. It renews automatically until you cancel.
How to use it
Settings › «See NetBlade Pro», choose a plan and confirm with the App Store.
To cancel, go to iOS Settings › your name › Subscriptions, at least 24 hours before renewal.
If you reinstall the app or change device, tap «Restore» on the plans screen.
Limits
The free trial is available once per Apple account.
10
Privacy
NetBlade has no server: what it finds stays on your device.
Scans, devices, saved networks and timeline are kept on the device, in the app's local database. Your phone's iCloud backup includes them, as it does for other apps. The subscription, too, is verified on the device by the App Store, without going through any NetBlade server.
Windows, SSH and FTP passwords and SNMP credentials are kept in the iOS Keychain, on this device only. They never go into the backup file and are not sent anywhere else.
NetBlade contacts outside services only when you use the feature that needs them: Cloudflare for the speed test, ipinfo.io for Internet and the public IP, ipwho.is for the traceroute map, Shodan InternetDB for your public IP's exposure in Network score and Hostile network check, crt.sh for Domain recon, Have I Been Pwned for the password check (only part of the hash leaves), the National Vulnerability Database for the vulnerability check (only if you turn it on, and only program names and versions), a Google check address to detect captive portals, and WHOIS servers for WHOIS lookups.